Easy Printmaking Ideas Simple Printmaking Designs Sunset
Today's post is going to look at three types of printmaking that you can do at home. But let's start with what printmaking is!
The most basic definition might be the transfer of an image from one surface to another (we're not talking about digital printing). So, maybe you want to make a design and then print lots of copies, or perhaps you want to experiment with new materials that produce unexpected results; with printmaking there is a whole world of possibilities!
With SO MANY different forms that printmaking can take (and I encourage you to investigate beyond this post), each producing wildly different results, we're going to focus on three examples of processes with versions of each you can try at home.
We'll look at Relief Printing, Monotyping, and Photo Transfer.
Let's start with Relief Printing, the oldest printing process. The basic idea of this process is that you are printing an image raised up from a beginning surface, so often you start from a solid printing block, cut away around the desired image, then apply ink or paint to the raised material, and that's the image that prints. A basic version of this is stamps!
The earliest relief prints were woodcuts:
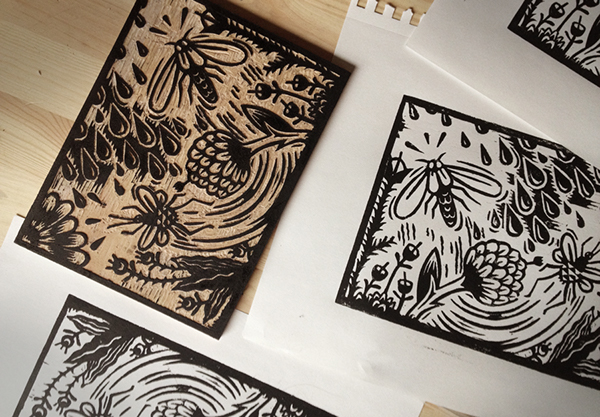
[Source: portfolios.risd.edu]
And there are many many materials that can be used for relief printing. Each produce different results and are different to work with, requiring different tools. I encourage you to research far beyond this blog post if any of these techniques strike your fancy!
But as for what you might have around the house, do you have a potato? Or maybe a rectangular eraser? Or a wine cork? All of these are great possibilities for trying out some relief printing today! And let me say, once you understand the basic concept, all of these materials will make total sense to you.
Keep in mind, with any of these, each might suggest a specific ink or paint, but for each of them, you can try different materials of your own! You can try acrylic paint, or actual printmaking ink like THIS. And for the stamps, you can also use them with an ink pad like THIS.
With any of these projects in which you're printing onto paper, it's always best to use a heavier, thicker paper, since your applying a wet media to it (paint or printing ink).There are pads of paper made for printmaking , or you can use something like mixed media paper is you already have some of that for other kinds of art and crafts.
Oh, and an important note that applies to EVERY printmaking process we're talking about here: Don't forget, the final image will be the REVERSE of the design you print with!
What's the most inexpensive, simplest thing you can do relief printing with? A potato ! Making stamps for printing out of potatoes is easy and fun, and definitely a great at-home project.
Here's a video showing how to do it with a paperclip!
And some inspiration images for designs:


[Source: linocutboy.com]

[Source: fun-stuff-to-do.com]

[Source: tigersheds.com]
And now a small tutorial for doing a very similar process with an eraser! Probably you're already beginning to figure out the basic idea?
For this one, you might want a craft knife, something like THIS . (Parents.. help out your kids with this one, please)
Here's the Eraser Tutorial .

And here's one final tutorial for a Cork Stamp .

NOW, moving on to Monotyping !
This process involves applying paint or ink to a smooth surface, pushing it around with one tool or several, then using that image to print onto paper.
This is traditionally done on a plastic or glass plate meant for the process, but you can get into it with a variety of surfaces!
Here's one way to do it with a plastic bag: Plastic Bag Printmaking
And here's one with the underside of a baking pan: Monotype Printing Project
A couple materials notes on the above two examples :
-
A good way to apply paint evenly in the kind of thin layers usually desired in printmaking is with a brayer, which is a roller like THIS . You can definitely also apply the paint with a brush if you want to use something you already have.
-
For working with the paint to make your image, you can use a brush, you can use Q-Tips , a paper towel-covered finger, or anything else you can think of!
Now this brings us to a very different kind of process: direct image transfer !
This involves transferring a photo image directly onto another surface. While it's not really in the same category as the above two processes, I think it's a fun at-home craft idea that you might enjoy.
The materials you'll need for this are:
- an image to transfer:
- This can be a magazine page, a printed image from a laser printer (inkjets don't work as well), or a photocopy
- a smooth wood block, canvas or other sturdy surface to transfer your image onto
- acrylic gel medium
- Brush (for spreading the acrylic gel medium)
- Scraper or credit card or brayer (any of these can be used for the step in the process that involves smoothing out the image)
- Eraser, toothbrush, or soft rag (any of these can work for the final step of removing the original image)
Here are a couple tutorials on how to do this (for both of these processes, you can also use a magazine page, because they're laser-printed!):
Image Transfer from Computer-Printed Image
Image Transfer to Wood
[NOTE: If you're using an image of your own that you're printing out, don't forget to make it a mirror image of what you want it to look like in the end!]
Okay, so... There are some basic printmaking ideas!
As always, we would love to see what you make! Send any photos along to Workshops@ViewArts.org .
Enjoy!
Sincerely,
The Team at View
Source: https://www.viewarts.org/workshops/view-from-home/printmaking-at-home/
0 Response to "Easy Printmaking Ideas Simple Printmaking Designs Sunset"
Postar um comentário